Showing posts with label general craft. Show all posts

Saturday, 31 January 2015

Making a sewing kit for your pre-schooler

Something that warmed the cockles of my crafty heart this morning was watching the Microbe's intent little face as he fed a huge plastic needle through the pre-punched holes of a little sewing kit that I'd made him. He wasn't very well today and it was a perfect activity for a sick boy on a rainy day.


He had his very first go at sewing at Christmas, courtesy of a Mister Maker hand-puppet kit and it struck me the that 3 1/2 is an ideal age to start gathering together your very first bits and pieces for sewing.

After a quick sift through 8,000 candy-pink kits on the internet, I decided that it would be more fun, and probably cheaper, to put together my own customised sewing kit for him, tailored to his interests.

Behold - the sewing menagerie!


I made these little animal kits just by cutting out shapes from scraps of felt and punching holes around the edges using a leather punch. Luckily I had a little stash of felt at home, but I noticed that Poundland also sells multi-packs of brightly-coloured A5 sized pieces. The stuffing is salvaged from a bit of left over quilt wadding, but you could just as easily use offcuts of yarn as stuffing.

The yarn in his kit is from Poundland. Not the nicest quality acrylic, to be honest, but it's ideal for this purpose and you get 3 balls for £2. I re-wound a selection of colours into tiny balls and have also supplemented it since with a handful of brightly coloured Lion Brand Bonbons. (These are the world's cutest and tiniest sample-size yarn balls, discovered thanks to my highly enabling friend, Charlotte!)


The other thing I've added to his kit, thanks to a great suggestion from a friend, is a few sheets of plastic aida with large holes. You can leave them blank or draw shapes on these using a sharpie, for a child to sew along. At some  point I might add some large-holed buttons too, so he can play with sewing those on. As for needles, you can get sets of children's plastic needles for around £1 on eBay or Amazon.


So far all of our bits and bobs are residing in a little cardboard box - but a lovely friend of ours has bought him this fab little animal-themed sewing box, which looks absolutely perfect!


So - if you know any tiny people that love to craft, I'd definitely recommend spending a happy afternoon putting together a little kit like this. Applique templates online can be a good source of ideas for simple shapes that will work in felt.


Saturday, 22 November 2014

Honeycomb tissue paper

Hello dear old craft blog. Here's a rapid fly-by just to mention my recent discovery of honeycomb paper...


I presume this is the stuff that paper xmas decorations are made of, but I hadn't realised you could buy it in sheets for crafty shenanigans.  Good old Pinterest enlightened me and the microbe and I have had a go at using it today for a trio of children's 'pop-up' birthday cards.


If you're in the UK and fancy giving it a try, you can get honeycomb paper on Amazon and Ebay.  (Mine came from a seller called Lyndie's Craft).

The sheets are a bit smaller than A4 and it seems as though you can cut out pretty much any shape in cross-section in order to get a 3d effect.  I expect you could use it to make a garland of paper spheres too.

Well... that's it.  A fly-by as promised.  Toodle pip.


Sunday, 6 April 2014

Customised Toddler T-shirts

Last weekend I had the idea of making customised t-shirts for my son, which started with a brief flurry of activity using special printer paper that you iron onto fabric such as t-shirts and tote bags, and ended with applique.

For transfers, there are two types of paper available - one is designed for ironing onto white fabric and the other for dark fabric. The white version works by printing in mirror-mode. You have to prepare and print your image as a mirror version of your end result - then you simply place your printed image face down on the t-shirt and iron over it.

This worked pretty well, and I made three animal-themed shirts, all of which went down very well with the microbe...


The dark paper works differently. You print in regular (non-mirror) mode and then peel off an (almost impossible-to discern) backing sheet before ironing the image onto the shirt through a layer of silicone paper.

I'm afraid to say that this stuff was a total flop for me. It seemed like I had to hold the iron over it for a decade before the image would think about adhering to the t-shirt and, even then, it transferred so thinly that the colour of the t-shirt showed through. I don't know what I did wrong. I was sure I'd followed the instructions - but perhaps my iron is just not suitable.


After this failure, I had a much better idea - applique! I'd never done this before but decided to have a go using some of my Liberty scraps.

I used an approach that gives you nice neat shapes with no raw edges. As a first step, you draw your desired shape freehand onto a piece of interfacing. Then you sew it together with a fabric scrap, with the right side facing inwards, stitching all the way around your drawn outline.

As a last step, you cut a slit in the interfacing and turn the while thing inside-out and iron it flat, leaving a lovely applique shape with no raw edges, ready to sew onto the t-shirt. (I attached mine simply by zig-zagging all the way around the edges on my sewing machine)


I love the results of these applique experiments and I'd like to do more.  Next time I might see whether it makes a difference to use iron-on interfacing, to get the applique fully adhered before sewing around the edges.

Tuesday, 17 December 2013

Quick, easy and festive birdseed cakes

Do you fancy feeding the birds AND doing something fun with a small child?

This is a quick fly-by to share this brilliant and easy recipe for birdseed cakes. I followed this lady's instructions and it worked perfectly and made a gazillion of them.

All you need is bird seed, flour, water and syrup - and something like a cookie cutter to mould them in.  You can make any shape but as it's December I have made mine festive.

Now I just have to find a cat-proof place to hang them!  Hope the birds like them... 


(NB: the recipe suggests corn syrup but if you are in the UK it's easier to use golden syrup and works just as well.)


Follow my blog with Bloglovin

Thursday, 12 December 2013

Toddler's Own Christmas Tree

A little while ago I was inspired by this link on Pinterest for a toddler-friendly Christmas tree that little ones can decorate and un-decorate at will, so I decided to have a go.  (Essentially it's just a giant fuzzy felt tree - how hard could it be?)

I decide to make a stiff one with a cardboard skeleton, so that I could hang it on a panelled door, so I started by cutting out a tree shape from the side of a large cardboard box...


Next I went on the lookout for green felt.  After a bit of googling I discovered that there is such a thing as sticky-back felt - hooray!  You can get it at various places but I eventually ordered mine online from here and also a mixed bundle of coloured felt squares and some spotty felt from ebay.

Once the felt arrived it was just a case of sticking it on and cutting out bauble and present shapes.  I glued the presents around the base with a glue gun but the baubles and the star are all designed for maximum toddler fiddling.

I think the microbe likes it...


(The only trouble I'm having now is getting it to stay on the door using white-tac - it keeps popping off, so I'm thinking hanging it on a picture hook instead.)


Saturday, 6 October 2012

Book Release - ta-daaa!

Hooray!  After an almost craft-free year of toddler-rearing, I am excited to announce some actual crafty news.

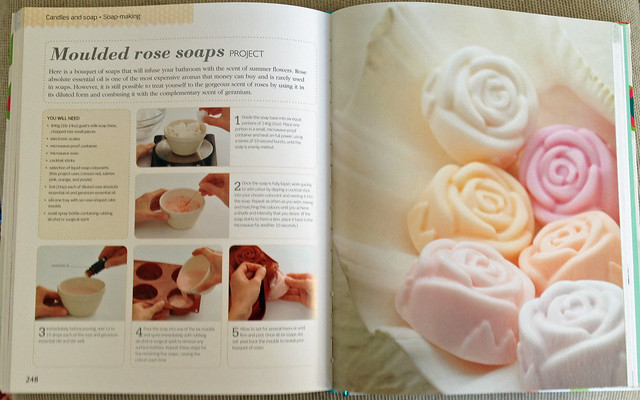
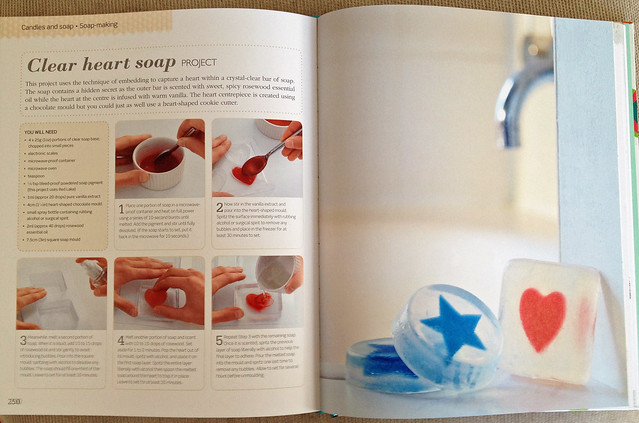
Readers with a very good memory might remember me mentioning that I took on a small job with Dorling Kindersley last year to author the soapmaking chapter of their new all-round Craft Book.

Fast-forward by 12 months... and ta-daaa!  The book has just been released in time for Christmas 2012.


As you can see, they have gone for the same 'vintage-style' cover design as the partner book entitled Dressmaking.

It was such a lovely surprise when my copy landed with a heavy thunk from the postman last week.  Now that I've had time to take a good look through it, I'd say it's looking like an ideal book for multi-crafters and anyone who likes to try their hand at different things.  The crafts include a very wide range of pursuits, including furniture-painting, wirework, sillk and glass-painting, metal-clay moulding, patchwork and lots more.

Each chapter starts with a clear step-by-step how-to guide on the craft in question, followed by a series of specific projects to make at home.


Does anyone fancy a sneak preview of my soapmaking chapter?  Here are snapshots of a few of the pages...


In case anyone out there is inspired enough to want to buy the book...

  • UK readers can buy it from Amazon here 
  • US readers can buy it under this slightly different name:  Craft (Dk Crafts)
Enjoy!


Wednesday, 8 February 2012

And now for something completely different

Well hello there!  I've been living in a crafty vacuum since Microboy was born, but I might have developed a very slight Pottery Cafe habit of late.  Today I picked up these two bowls that I painted last week.


No idea what I will do with them.  Apparently they are 'baby bowls' but - really?   Who on earth gives ceramic bowls to babies?  I suppose they might make a brief but appealing sight as they go frisbeeing past my head.  Personally I think they are more realistic as cereal bowls.  Not that I need any new bowls at all.  Oh well.  I might find a use for them somewhere.

In more exciting news, this week I received the sample layouts for my soapmaking chapter in the new craft book.  The photography looks really nice.  I'm still not sure when the book will come into the shops, but I'll be sure to post an update when it does.

Tuesday, 1 March 2011

My new favourite podcast

This week I'm pleased to report that I have discovered a new crafty podcast called iMake.

Having listened to the first ten episodes, it has become a favourite for various reasons. For one thing, it makes a nice change to listen to something that is about general crafts - as opposed to just knitting. It keeps making me want to try out new things, or rediscover crafts that I used to do and have forgotten about. For another, it's just rather lovely to put my headphones on during my hectic daily commute and listen to a gentle, enthusiastic voice wittering on about soothing crafty things.

The presenter is very easy to listen to, being a softly spoken Guernsey lass. So far she has talked about jewellery making, precious-metal-clay, papercrafting, sewing and knitting (and I can see that later episodes will be covering soap making and other crafts).

If you'd like to listen to her 30-second promo for the podcast, click here

To visit her craft blog and subscribe to the podcast, click here