Sunday, 4 January 2015

Silver Clay Flower Pendant

Well hello there, dear old blogspot. Do you remember me? 

To kick start 2015, I thought I'd pop in and share a long overdue post about my first experiements with precious metal clay. I had a mini-obsession with this stuff early last year and my first project was this silver flower pendant. 


For anyone curious, metal clay is essentially powdered metal (in this case silver) held together with a binder that makes it behave like a clay.

You can buy it in tiny little quantities of 5 or 10 grams and make your own custom jewellery items such as pendants, charms, rings and even bracelets. You can also get it in syringes for fine work and in paste form, which is useful for making repairs and 'glueing' bits of clay together before firing.

When it comes out of the packet, you'd never know it was made of silver as it's a greyish white colour and behaves a lot like an ordinary clay. You can roll it out and shape it into anything of your choosing and I suspect anyone who's good at sugarcraft would find metal clay a breeze. (I used sugarcrafting tools to help with the cutting and shaping of this piece.)

A word of warning is that it does want to dry out very quickly. I found the trickiest element overall was having to model my fiddly flower shape at speed.


Because I was making a pendant, I punched a hole in the middle of the flower so that I could feed through a sterling silver wire, which was attached at the back to a silver hanging loop. These were secured in place to the main flower shape using silver clay paste.

Once I was happy with the flower shape, I let it air dry on a piece of mesh before firing it on my gas hob for a few minutes.

Incidentally, I advise NOT dropping it en route to the hob. This stuff is more fragile than an egg-shell and I ended up making so many repairs to my piece with watered-down silver paste that I might as well have started again.


Firing is where the magic happens. The binder burns away and, before you know it, your clay has turned into a piece of solid silver.  (For those who don't have a gas hob, you can also use a blowtorch).

You can't tell that it has become silver straight away, as it still  looks white and chalky, but as long as you've followed the instructions and fired for the right number of minutes, have faith and take it off the hob. I picked my piece up with tweezers and left it to cool for a few minutes before burnishing. If you drop it at this point, it will go "clang" like a piece of metal (ask me how I know)

Burnishing is the final step. This is where you rub the fired piece all over using a metal object, which can be anything from a special burnishing tool to a large paperclip. As soon as you start, you'll begin to see the silver sheen revealing itself, which is rather exciting.


The more you burnish, the shinier your finished piece will be.

Once mine was polished to a high shine all over, my final touch was to trim the piece of silver wire that was sticking out of the front so that it was just long enough to hold a freshwater pearl bead, which I secured using jewellery glue and this now forms the centre of the flower.

I must confess that it's been a year or so since I sent my metal clay and its paraphernalia up to the hobby graveyard (aka the loft) but I fully intend to get it back out again at some point.

Sunday, 7 December 2014

Adventures with Lino Printing

This is just a quick post to share some little lino prints that I made using this lovely kit that my partner bought me for Christmas.

I'd been meaning to have a go at lino printing for years, having often admired other people's work, and it was great fun to finally get stuck in.  

For my first go I carved an image based on one of my own paintings from years ago, and ran off a few prints.  


For the second image, I tried something new. I had the idea that planning out my design using white chalk on black paper would feel as close as possible to the creative process of lino-carving - (i.e. if I can get it to work using white chalk, then it ought to work as a carved out piece of lino... yes?)


As it turned out, the theory was quite right and I'd recommend it. However I did make a few clumsy cutting errors in this one that stopped the final image from being quite as successful as I'd hoped. Lino is nothing if not unforgiving!


Now I have the bug - I just need to find the time to do some more... 


Saturday, 22 November 2014

Honeycomb tissue paper

Hello dear old craft blog. Here's a rapid fly-by just to mention my recent discovery of honeycomb paper...


I presume this is the stuff that paper xmas decorations are made of, but I hadn't realised you could buy it in sheets for crafty shenanigans.  Good old Pinterest enlightened me and the microbe and I have had a go at using it today for a trio of children's 'pop-up' birthday cards.


If you're in the UK and fancy giving it a try, you can get honeycomb paper on Amazon and Ebay.  (Mine came from a seller called Lyndie's Craft).

The sheets are a bit smaller than A4 and it seems as though you can cut out pretty much any shape in cross-section in order to get a 3d effect.  I expect you could use it to make a garland of paper spheres too.

Well... that's it.  A fly-by as promised.  Toodle pip.


Sunday, 12 October 2014

Adventures with ProMarker Pens

This post is dedicated to my discovery of some great little pens that are a joy to draw with and can be layered almost like watercolour paint.

These Letraset Promarkers come in 1001 colours and are really marketed at graphic and comic-book artists, but a local painter named Stephanie Wilkinson showed me how you can use them with high grade watercolour paper to get quite a different result.

It was in her workshop that I did this sample piece, using a style that she refers to as ‘pattern painting’.


Unlike graphic paper, which gives you a flat, comic finish, the watercolour paper sucks the ink straight out of the nib, giving a deeply saturated and almost painterly effect. Admittedly you get through twice as many pens this way, but I guess that's the price for such a vivid finish.

You can also layer them and, because they flow so well, I've found them very enjoyable to draw with. It's also a much more casual affair than getting out my paints and easel and so on, meaning that time-poor people like me can enjoy doing impromptu little sketches far more often than before.

After my session with Stephanie I had fun banging out this series of informal little sketches at home, mainly to amuse my animal-mad son. I'm sure I'll be playing with these pens some more, when the urge next hits...


Sunday, 6 April 2014

Customised Toddler T-shirts

Last weekend I had the idea of making customised t-shirts for my son, which started with a brief flurry of activity using special printer paper that you iron onto fabric such as t-shirts and tote bags, and ended with applique.

For transfers, there are two types of paper available - one is designed for ironing onto white fabric and the other for dark fabric. The white version works by printing in mirror-mode. You have to prepare and print your image as a mirror version of your end result - then you simply place your printed image face down on the t-shirt and iron over it.

This worked pretty well, and I made three animal-themed shirts, all of which went down very well with the microbe...


The dark paper works differently. You print in regular (non-mirror) mode and then peel off an (almost impossible-to discern) backing sheet before ironing the image onto the shirt through a layer of silicone paper.

I'm afraid to say that this stuff was a total flop for me. It seemed like I had to hold the iron over it for a decade before the image would think about adhering to the t-shirt and, even then, it transferred so thinly that the colour of the t-shirt showed through. I don't know what I did wrong. I was sure I'd followed the instructions - but perhaps my iron is just not suitable.


After this failure, I had a much better idea - applique! I'd never done this before but decided to have a go using some of my Liberty scraps.

I used an approach that gives you nice neat shapes with no raw edges. As a first step, you draw your desired shape freehand onto a piece of interfacing. Then you sew it together with a fabric scrap, with the right side facing inwards, stitching all the way around your drawn outline.

As a last step, you cut a slit in the interfacing and turn the while thing inside-out and iron it flat, leaving a lovely applique shape with no raw edges, ready to sew onto the t-shirt. (I attached mine simply by zig-zagging all the way around the edges on my sewing machine)


I love the results of these applique experiments and I'd like to do more.  Next time I might see whether it makes a difference to use iron-on interfacing, to get the applique fully adhered before sewing around the edges.

Friday, 31 January 2014

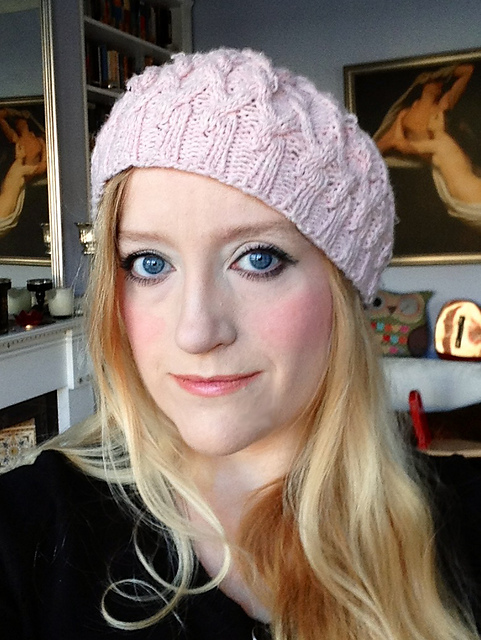
Gretel beret - knitted at last!

It's hard to believe but I actually knat something to completion last week.

We shall not talk about the HEINOUS number of UFOs that continue to languish in every cranny of my flat. It turns out that, if I want to actually complete something, hats are where it's at.

So - here be Gretel...  only 3 years later than intended.

Made using Rowan Silky Tweed in 'Bolero', purchased on a whim thanks to the highly-enabling post-Xmas sale at Black Sheep Wools.  As always, full details are on Ravelry.

When I added this pattern to my queue in 2010 I imagined I'd make it in grey, as with every other thing that I knit for myself.  But in the end I rather like it in pink.  And pink goes with grey...  right?

I decided to use some of the leftover yarn to make a curly scarf to go with it but the finished product isn't quite hitting the spot for me. I think it wants to belong to a small girl, really, so for now it's languishing on a wardrobe shelf.

Tuesday, 17 December 2013

Quick, easy and festive birdseed cakes

Do you fancy feeding the birds AND doing something fun with a small child?

This is a quick fly-by to share this brilliant and easy recipe for birdseed cakes. I followed this lady's instructions and it worked perfectly and made a gazillion of them.

All you need is bird seed, flour, water and syrup - and something like a cookie cutter to mould them in.  You can make any shape but as it's December I have made mine festive.

Now I just have to find a cat-proof place to hang them!  Hope the birds like them... 


(NB: the recipe suggests corn syrup but if you are in the UK it's easier to use golden syrup and works just as well.)


Follow my blog with Bloglovin

Thursday, 12 December 2013

Toddler's Own Christmas Tree

A little while ago I was inspired by this link on Pinterest for a toddler-friendly Christmas tree that little ones can decorate and un-decorate at will, so I decided to have a go.  (Essentially it's just a giant fuzzy felt tree - how hard could it be?)

I decide to make a stiff one with a cardboard skeleton, so that I could hang it on a panelled door, so I started by cutting out a tree shape from the side of a large cardboard box...


Next I went on the lookout for green felt.  After a bit of googling I discovered that there is such a thing as sticky-back felt - hooray!  You can get it at various places but I eventually ordered mine online from here and also a mixed bundle of coloured felt squares and some spotty felt from ebay.

Once the felt arrived it was just a case of sticking it on and cutting out bauble and present shapes.  I glued the presents around the base with a glue gun but the baubles and the star are all designed for maximum toddler fiddling.

I think the microbe likes it...


(The only trouble I'm having now is getting it to stay on the door using white-tac - it keeps popping off, so I'm thinking hanging it on a picture hook instead.)


Saturday, 6 October 2012

Book Release - ta-daaa!

Hooray!  After an almost craft-free year of toddler-rearing, I am excited to announce some actual crafty news.

Readers with a very good memory might remember me mentioning that I took on a small job with Dorling Kindersley last year to author the soapmaking chapter of their new all-round Craft Book.

Fast-forward by 12 months... and ta-daaa!  The book has just been released in time for Christmas 2012.


As you can see, they have gone for the same 'vintage-style' cover design as the partner book entitled Dressmaking.

It was such a lovely surprise when my copy landed with a heavy thunk from the postman last week.  Now that I've had time to take a good look through it, I'd say it's looking like an ideal book for multi-crafters and anyone who likes to try their hand at different things.  The crafts include a very wide range of pursuits, including furniture-painting, wirework, sillk and glass-painting, metal-clay moulding, patchwork and lots more.

Each chapter starts with a clear step-by-step how-to guide on the craft in question, followed by a series of specific projects to make at home.


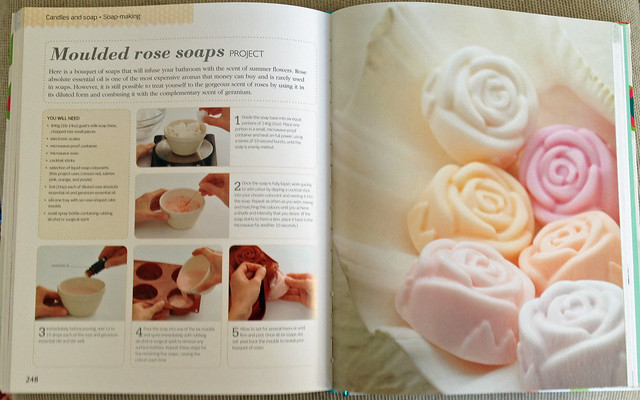
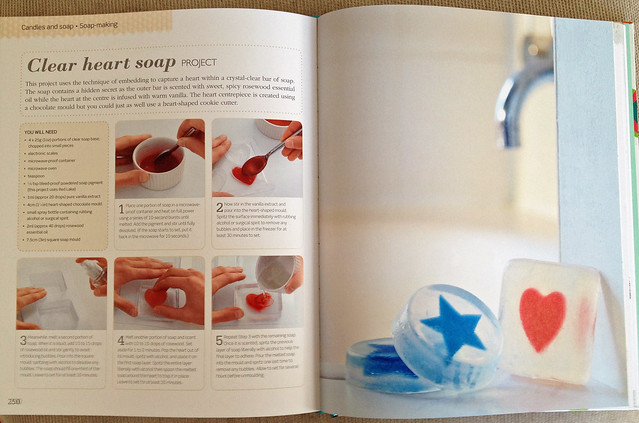
Does anyone fancy a sneak preview of my soapmaking chapter?  Here are snapshots of a few of the pages...


In case anyone out there is inspired enough to want to buy the book...

  • UK readers can buy it from Amazon here 
  • US readers can buy it under this slightly different name:  Craft (Dk Crafts)
Enjoy!


Wednesday, 8 February 2012

And now for something completely different

Well hello there!  I've been living in a crafty vacuum since Microboy was born, but I might have developed a very slight Pottery Cafe habit of late.  Today I picked up these two bowls that I painted last week.


No idea what I will do with them.  Apparently they are 'baby bowls' but - really?   Who on earth gives ceramic bowls to babies?  I suppose they might make a brief but appealing sight as they go frisbeeing past my head.  Personally I think they are more realistic as cereal bowls.  Not that I need any new bowls at all.  Oh well.  I might find a use for them somewhere.

In more exciting news, this week I received the sample layouts for my soapmaking chapter in the new craft book.  The photography looks really nice.  I'm still not sure when the book will come into the shops, but I'll be sure to post an update when it does.

Friday, 21 October 2011

News! And what I have been up to...

Yeep!  It's been ages since I updated.  But in fact I have been ludicrously busy on the craft front and I have two things to mention...

First of all, I am a lil bit excited to announce that I've been doing some handmade soap projects for another craft book that is due to come out soon.  I'll post more details once I know the release date, but for now I can say that it is going to be along the lines of a big book of mixed crafts (not dissimilar to Complete Craft)

I have to confess that there have been times in the last couple of months when I've cursed my own hubris for taking on this piece of work alongside a tiny baby.  Having to stop constantly to feed, change or entertain a baby means that things that would normally take me a day to accomplish have taken weeks... and some days have been spent in a sort of  fug of baby and soap, trying not to get bits of soap into the baby or bits of baby into the soap.  BUT - the copy is now written and last week I attended a two-day photo shoot where all of the step-by-steps were shot for the projects.  Hooray!

In other news, I am pleased to introduce Microboy's latest hat!  I knitted this months ago, but it is only now that it fits and I am entirely delighted with it.


Full details of pattern, yarn and so on are on Ravelry, here.

And now that I am done with the soap, I really must try to post here more often...


Monday, 5 September 2011

Tassel head strikes again

So... when I said that an Englishman can never have too many hats, I wasn't kidding.  This is just a fly-by to show off Microboy's latest, using the same free pattern that I published last week.  I thought he could do with some hot colours this time... and I love the fact that I can have such a thought, and a few hours later the hat is finished.  Instant gratification!  (The sharp-eyed amongst you might spot that his hat matches the cardie that was made for him by my talented knitty friend Maxine).

Anyway you might think of this as a sort of insurance policy for when he becomes a horrible teenager...  lets just say I am building up quite a library of photos. ;-)


(Full details and pattern link here on Ravelry).


Wednesday, 24 August 2011

New free pattern - Baby Tassels Hat

I've been meaning to publish the pattern for this simple little baby hat for ages.  Well, today is the day that I've finally got round to it!


This hat was the very first thing that I made for my little Microboy while he was still resident in my belly.  It was an improvised project to use up some leftover aran weight yarn and to exercise my yen for tassels.  But  the resulting hat turned out so cute that I decided to write up the pattern in case anybody else fancies having a go.


I used Amy Butler Belle Organic yarn, but you could use any aran/worsted weight yarn in a baby friendly fibre.  The pattern can be downloaded as a PDF file here.  (I've also added a permanent link on the right hand column of my blog)


Monday, 15 August 2011

Knitting for Microboy

The other day I woke up in a state of certainty about one thing...  this baby needs more hats!

This was fuelled largely by the tragedy of Microboy outgrowing his owl hat (boo hoo!) but also by the realisation that my new lifestyle as full time milkmaid does not leave a lot of room for large-scale hobbying.   Thus, in order to get my frustrated creativity out of my system, I predict an influx of teeny-tiny knitwear.

Anyway this little hat was knocked up in a couple of hours in front on the TV.

Iz cute, no?


I made it from Sirdar DK Crofter yarn, using a free pattern found on Ravelry, (As always, full details of the pattern and yarn, etc. are on Ravelry, here.)


Friday, 1 July 2011

9-month craft project

Well - I thought I would pop in and show off my latest FO...
 
This one took 9 months to make and is now 11 days old.  He's called James, and he is keen to model some of his knitwear, so here goes...

Minutes after being born


Three days old, in his owl hat


Five days old, in his jiffy bag